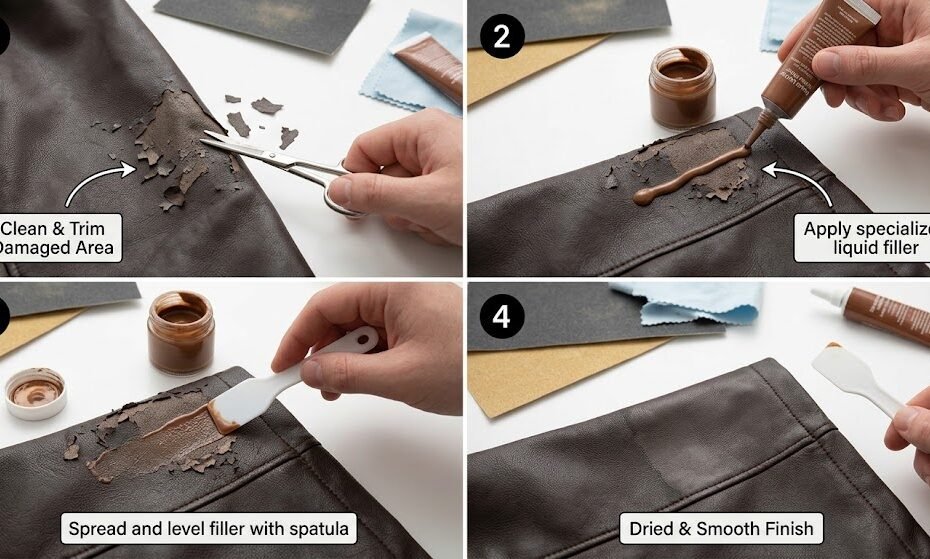
Faux leather (often made of polyurethane or PVC) offers a stylish, accessible alternative to animal hide, but it presents a unique structural challenge over time: peeling and flaking. Unlike genuine animal hide, which develops a rich patina as it ages, synthetic leather consists of a thin plastic coating bonded to a woven fabric mesh backing. Once UV light, friction, or humidity causes the top polyurethane layer to dry out and delaminate, the jacket begins to shed small, unsightly flakes. Knowing how to repair faux leather jacket peeling and surface damage allows you to save your favorite outerwear without spending a fortune on a replacement.
In 2026, sustainable wardrobe maintenance and circular fashion have made extending the lifespan of synthetic garments a top priority. While severe, widespread degradation across an entire garment is difficult to reverse permanently, localized flaking, collar wear, pocket cracking, and small snags can be restored seamlessly at home. This operational blueprint breaks down the exact chemistry, specialized compounds, and step-by-step methods showing you how to repair faux leather jacket wear, seal peeling surfaces, and keep your piece looking sharp.
Assessing Faux Leather Damage: Peeling vs. Punctures
Before gathering your repair supplies, inspect the jacket to determine whether the synthetic coating is simply flaking or if the structural fabric backing has torn.
| Damage Type | Visual Symptom | Recommended Repair Approach |
| Surface Peeling / Flaking | Top colored polyurethane coating is shedding; mesh backing is exposed | Liquid Leather & Acrylic Sealant. Peel away loose flakes, fill with color-matched compound, and seal. |
| Surface Cracking | Fine hairline cracks without loose flakes | Leather Paint & Flexible Binder. Fill the micro-fissures before they turn into full flakes. |
| Tears or Rips | Fabric mesh backing is cut through completely | Sub-Patch Method. Place an adhesive patch behind the mesh before filling the top surface. |
| Widespread Dry Rot | Entire jacket is shedding flakes upon touch | Not Cost-Effective. When the base polymer fully degrades, replacement is the practical choice. |
If you are trying to understand why synthetic hides behave this way compared to animal skin, review our side-by-side analysis on real leather vs faux leather longevity.
Essential Tools and Materials
To execute a clean home repair on synthetic leather, prepare the following items:
Fine-Grit Sandpaper (400 to 600 grit) or Soft Toothbrush: To clear away loose, delaminating flakes.
Rubbing Alcohol (Isopropyl 70%): To degrease the area and remove surface residue.
Flexible Vinyl/PU Leather Repair Compound: A color-matched liquid synthetic polymer filler.
Acrylic Leather Paint: For exact color blending and tone matching.
Clear Acrylic Matte/Gloss Finish Sealant: To lock the new polymer layer in place and stop future flaking.
Plastic Spatula or Palette Knife: For spreading the liquid filler flush with the surrounding grain.
Step-by-Step Guide: How to Repair Faux Leather Jacket Peeling
Follow this reliable five-step protocol to resurface and seal your jacket’s peeling zones.
Step 1: Remove All Loose Flakes and Clean the Surface
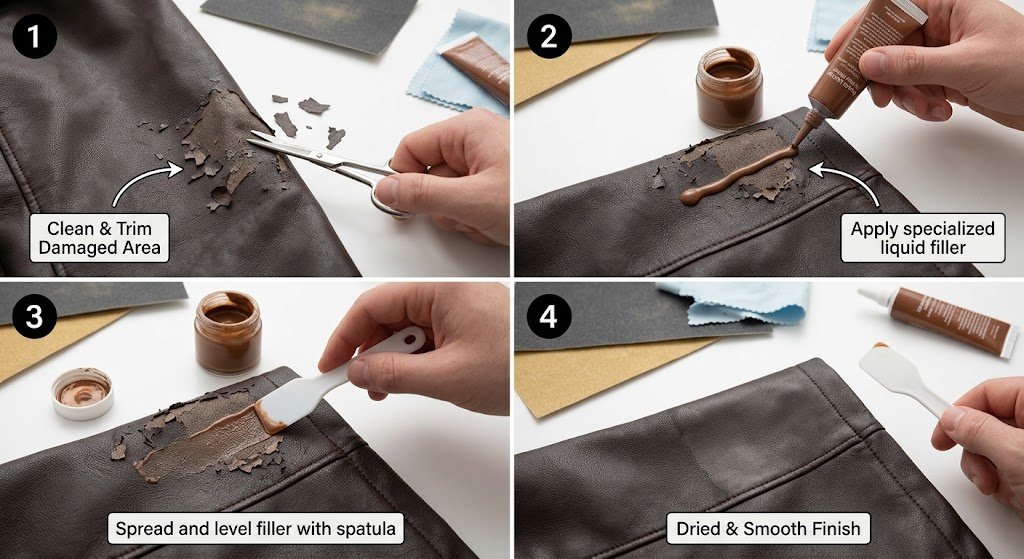
Never apply repair compound over loose, curling synthetic edges. Use a soft toothbrush or fine-grit sandpaper (400-grit) to gently buff away every loose flake surrounding the damaged area until you reach a stable, firmly bonded edge. Wipe down the entire section with a microfiber cloth dampened with isopropyl alcohol to remove all dust, skin oils, and debris.
Step 2: Apply a Thin Layer of Flexible Vinyl Repair Compound
Scoop a small amount of liquid faux leather repair compound with a plastic spatula or the edge of a credit card. Spread the compound across the exposed fabric backing in a thin, uniform layer, feathering the edges outward into the undamaged faux leather. Avoid applying one thick blob; thin, layered coats cure with significantly better elasticity and prevent premature cracking.
Step 3: Let the Filler Cure Completely
Allow the first layer of filler to air-dry for 1 to 2 hours. If you are working on a textured piece, you can press a textured grain paper or clean cloth onto the semi-dry compound for 10 seconds to imprint a subtle grain pattern. If the spot sits lower than the surrounding surface, apply a second thin coat and allow it to cure fully.
Step 4: Blend with Color-Matched Leather Paint
Once the filler is dry and level, assess the color match. If the repair compound does not match your jacket’s shade perfectly, use a small sponge or fine brush to apply thin layers of flexible acrylic leather paint. Dab the paint gently around the borders of the repair to blend the new patch naturally with the rest of the garment panel.
Step 5: Seal with a Protective Topcoat
The final and most crucial step in how to repair faux leather jacket peeling is applying a clear protective sealant. Brush or sponge a layer of flexible acrylic topcoat (matte, satin, or gloss, matching your jacket’s natural sheen) over the entire repaired section. This topcoat creates a durable, hydrophobic barrier that prevents friction from catching on the edges and peeling them again. For more tips on managing synthetic outerwear challenges, check our dedicated guide on how to fix peeling leather jacket 2 issues.
Preventing Future Faux Leather Degradation
Synthetic polyurethane coatings degrade primarily due to heat exposure, dry friction, and harsh chemical contact. To keep your repaired jacket intact:
Condition with Specialized Synthetic Protectant: Never use heavy animal-fat conditioners on faux leather, as they cannot penetrate the plastic coating. Instead, use a water-based vinyl protectant or a dab of baby oil every few months to maintain flexibility.
Keep Away from Radiators and Direct Heat: High heat accelerates polymer breakdown and causes rapid flaking. Always hang your jacket away from heaters, and never use a high-heat tumble dryer.
Store on Padded Hangers: Sharp wire hangers create pressure points along the shoulders that crack synthetic coatings over time.
Internal and External Resources
To ensure your outerwear rotation stays in top shape, explore these authoritative resources:
Internal: Want to explore quality entry-level alternatives? Check out our curated list of best affordable leather jackets 2026 buyers recommend.
Internal: Comparing durability across materials? Review our detailed comparison on real leather vs vegan leather durability longevity.
External: Visit Britannica to study the polymer chemistry and development history of polyurethane and synthetic textiles.
External: Consult the Leather Working Group for global guidelines regarding sustainable garment manufacturing and material lifecycles.
Conclusion
Knowing how to repair faux leather jacket flaking and surface snags gives new life to an essential wardrobe layer. By carefully removing loose particles, filling the exposed mesh backing with flexible repair compound, matching the color accurately, and sealing the surface with a durable topcoat, you can make worn sections look smooth and presentable again. With basic maintenance and gentle care, your faux leather outerwear will keep you looking sharp season after season.